
Sprouted Wheat Sandwich Bread with Seeds
This post may contain affiliate links. Please read my disclosure policy.

I first read about baking with sprouted grains several years ago in Chad Robertson’s Tartine Book No. 3, which offers a how-to sprouting guide and explains why we would want to do this in the first place:
Sprouting grains before mixing them into dough or milling them into flour makes them not only more digestible but also more nutritious.
To paraphrase from TBNo3:
At their sprouting (or germination) point, grains begin to transform from a seed into a plant, at which point, the dormant nutrients, minerals, and vitamins stored to nourish the plant become more accessible, which makes them easier for us to absorb. When we eat sprouted grains, we are digesting something more similar to a vegetable than a grain.
This sounded like a win all around—easier on the tummy, amped up nutrition. I researched grain sprouting further and discovered even more benefits: boost in fiber, unlocked flavor, and increased sweetness.
But as I looked more earnestly into the sprouting process—soak grains in water for several days, transfer to a clean jar, cover with cheesecloth, drain and aerate and rinse twice a day—I couldn’t help but feel discouraged. I kept thinking: Couldn’t someone do this for me?
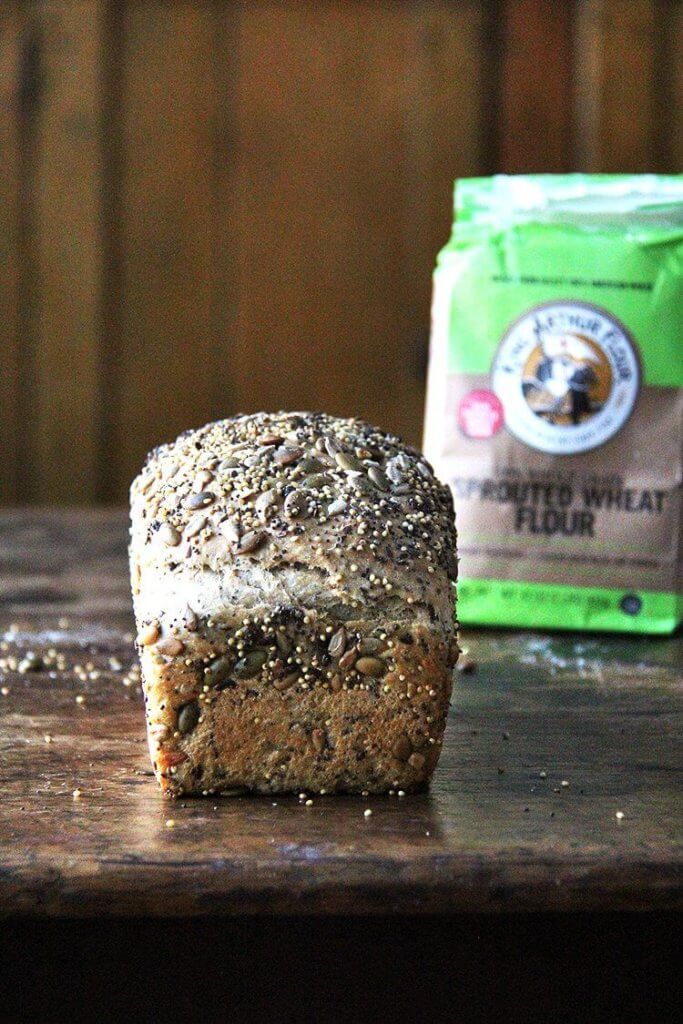
Yes! King Arthur Flour now sells Sprouted Wheat Flour. For the past month or so, I’ve been baking the sandwich bread featured here using half King Arthur Unbleached All-Purpose Flour and half King Arthur Sprouted Wheat Flour.
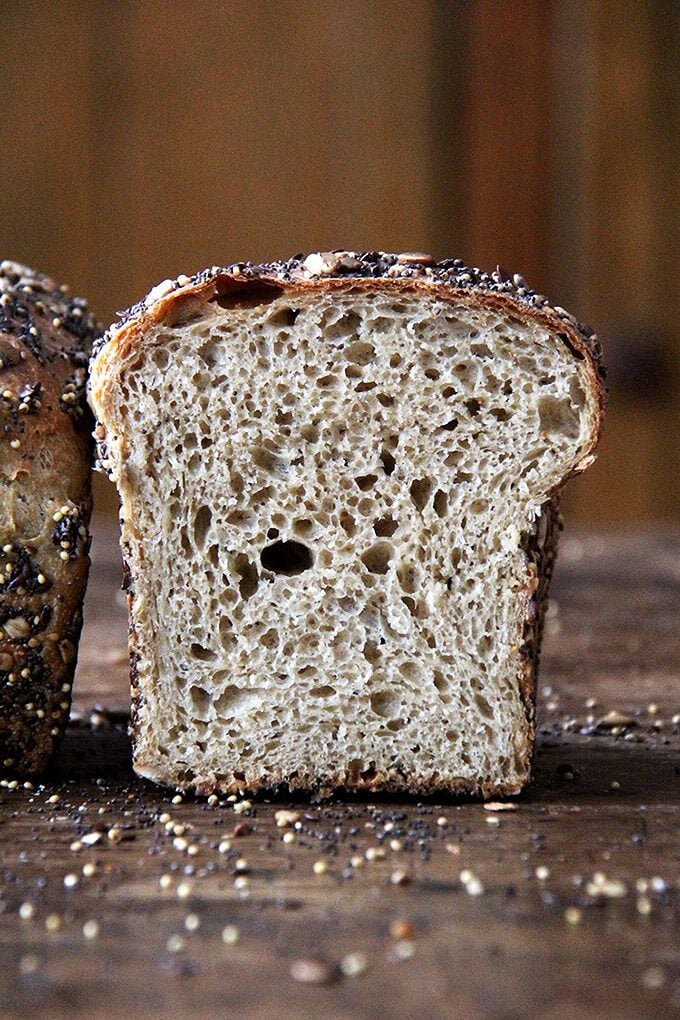
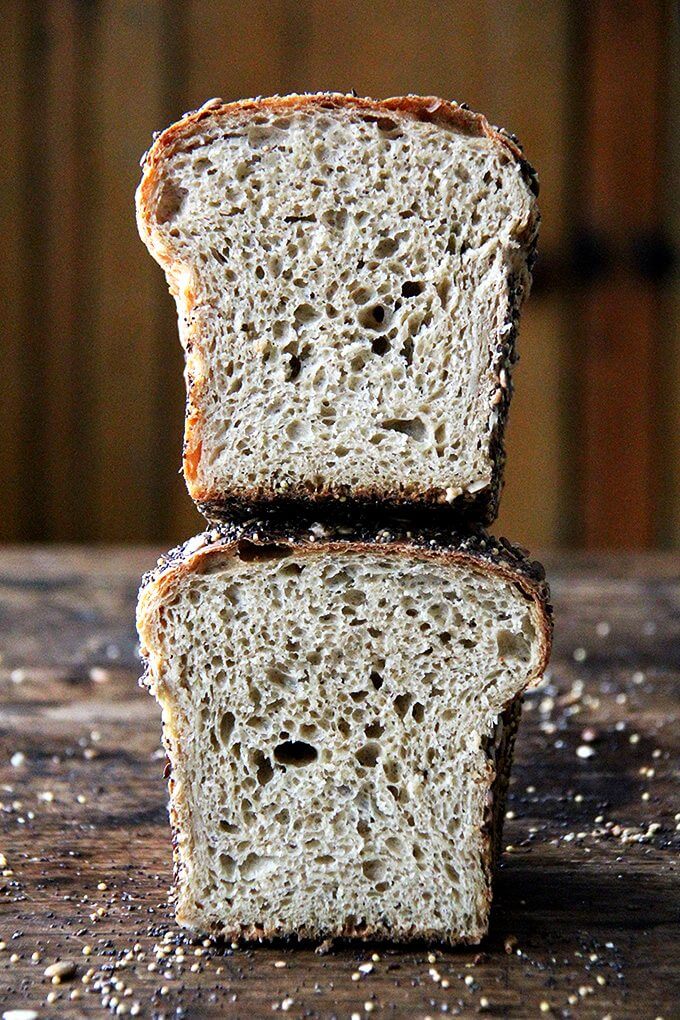
The loaves have been turning out beautifully, the crumb soft and light, the taste without a trace of bitterness. Most sprouted wheat flour on the market today is made from hard red wheat, which can taste bitter and behave more like a standard whole wheat flour.
King Arthur Sprouted Wheat Flour, on the other hand, is made from white whole wheat berries that, when sprouted, yield a creamier, sweeter, milder-tasting flour that can easily be used in any of your favorite recipes.
Traits of King Arthur Flour’s Sprouted Wheat Flour
- Smell: Every time I mix up a batch of this bread with the sprouted wheat flour, I’m surprised by how fresh the dough smells and how much more fragrant it is overall than other flours I’ve used.
- Taste: Sweet and nutty.
- Versatility: You can substitute King Arthur Sprouted Wheat Flour 1:1 for whole wheat flour or up to 50% for all-purpose in your favorite recipes.
- You can read more about King Arthur Flour’s patent-pending sprouting process and find more recipe inspiration in this guide on King Arthur Flour’s site.
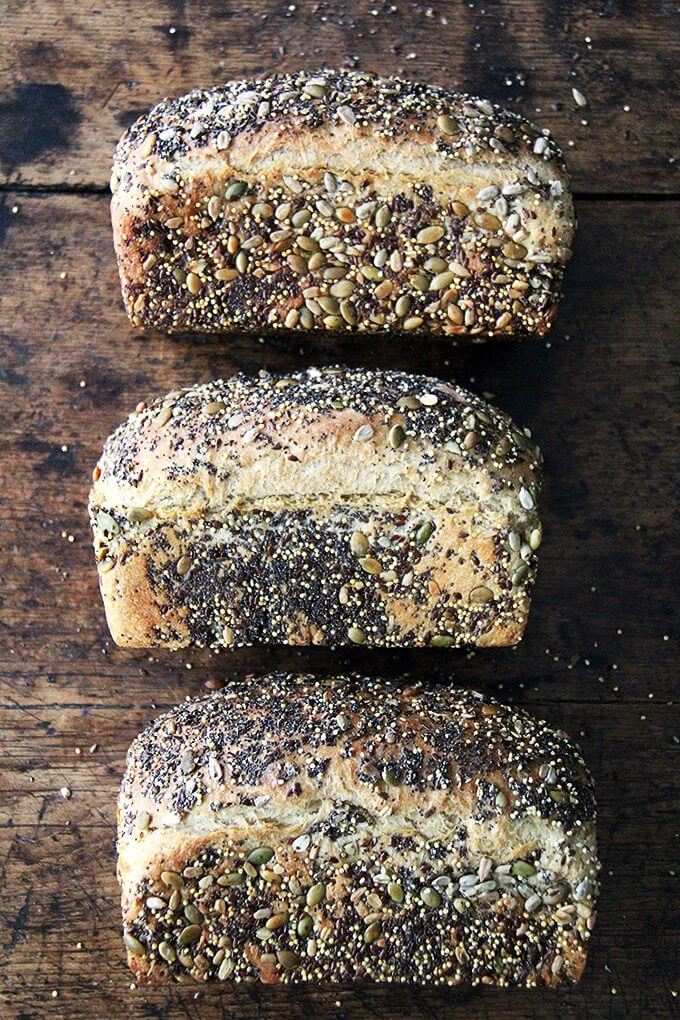
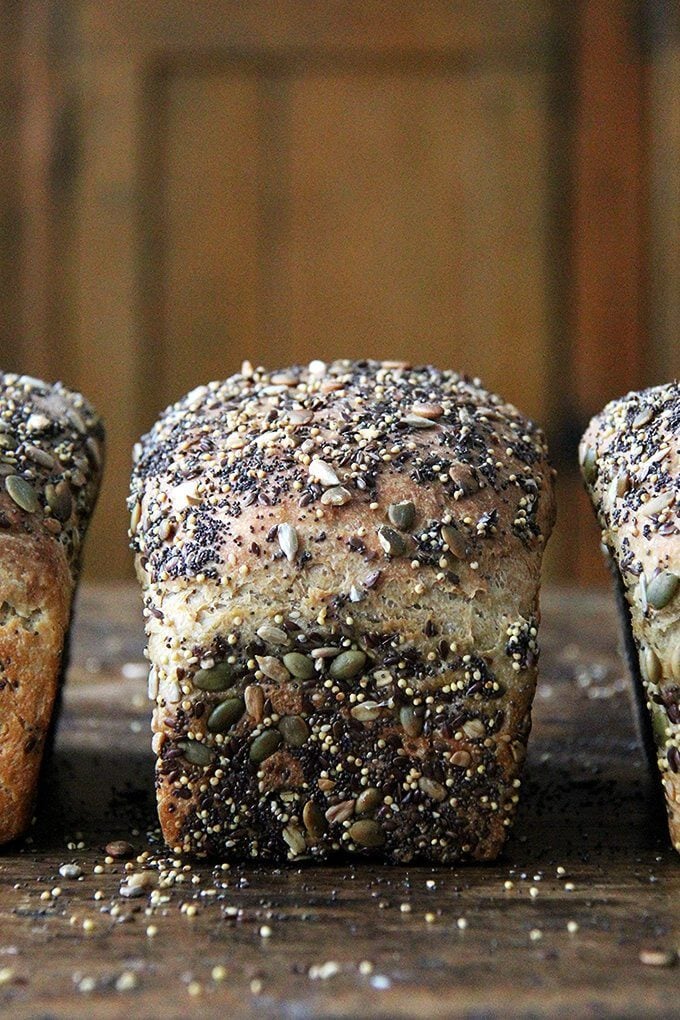
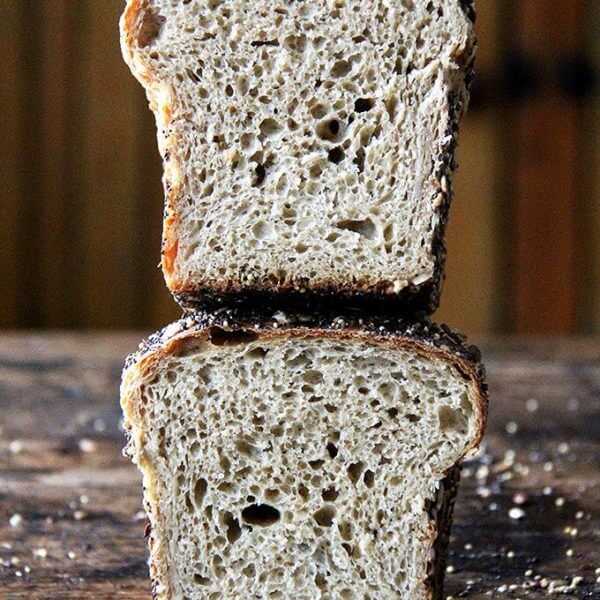
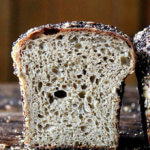
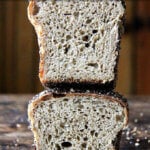
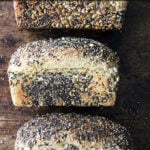
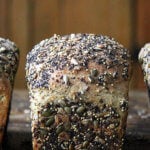
Seedy Sandwich Bread
This is a basic sandwich bread, coated in seeds or not—I love the seeds; my children do not, so I make it both ways, and everyone is happy. The original recipe is in Bread Toast Crumbs (soon to be released!) but here I’ve replaced half of the flour with the sprouted wheat flour.
A few tips:
• You can mix the dough at night, store the bowl (covered with plastic wrap or bowl cover) in the fridge, then proceed with the recipe in the morning. The key is to be patient the following morning after you transfer the dough to the loaf pans to let it make its second rise—it may take as long as two hours due to the temperature of the dough and the temperature of your kitchen.
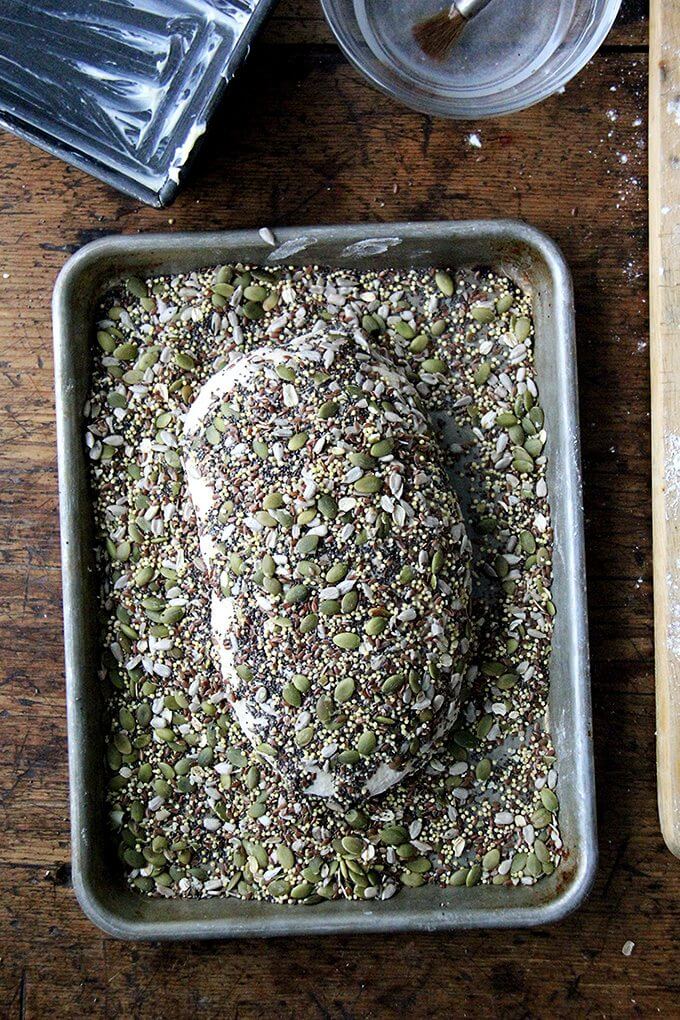
• Seed and grain mix: You can use anything you have on hand, from simply rolled oats to sesame seeds to every seed you have in your pantry: poppy, millet, sunflower, pumpkin, chia, flax, etc. I like to use ALL the seeds.
This post is sponsored by King Arthur Flour. Thank you for your support.


Sprouted Wheat Sandwich Bread with Seeds
- Total Time: 3 hours 45 minutes
- Yield: 2 loaves
Description
Adapted from the soft sandwich bread recipe in Bread Toast Crumbs.
Ingredients
- 3 cups (384 g) All-Purpose Flour
- 3 cups (384 g) Sprouted Wheat Flour or other whole wheat flour
- 1 tablespoon kosher salt
- 1 tablespoon sugar
- 1 tablespoon instant yeast
- 3 cups lukewarm water
- 1/3 cup neutral oil or olive oil
- softened butter for greasing
- mix of seeds: flax, millet, pumpkin, sunflower, sesame, poppy, chia—whatever you like, optional
Instructions
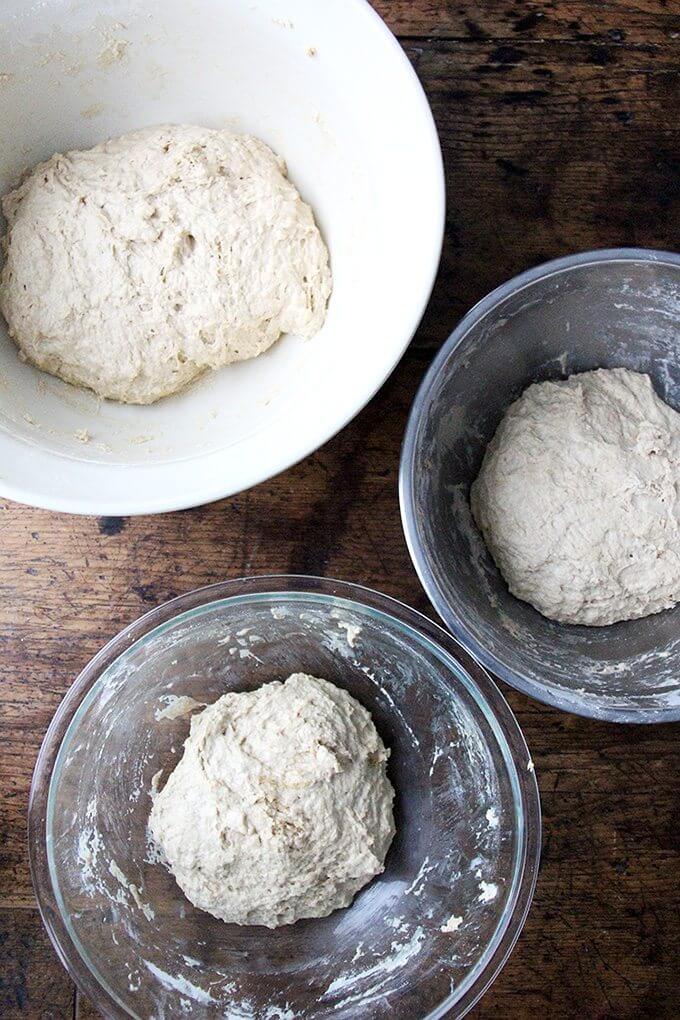
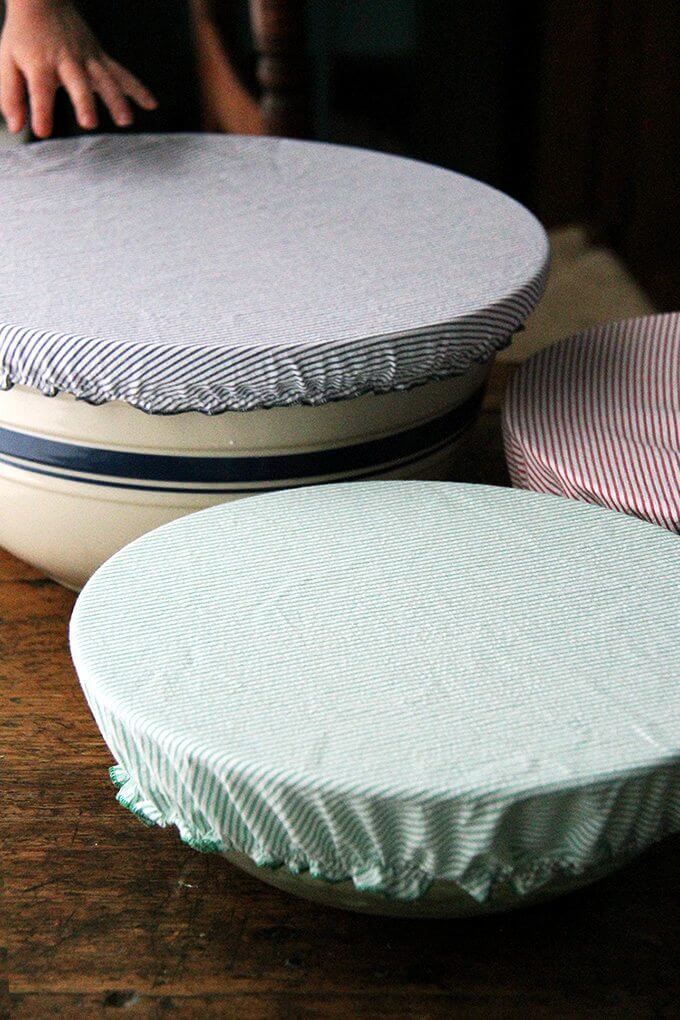
- In a large bowl, whisk together the flours, salt, sugar, and instant yeast. Add the water and oil. Using a rubber spatula, mix until the liquid is absorbed and the ingredients form a sticky dough ball. Cover the bowl with a damp tea towel, a bowl cover, or plastic wrap and set aside in a warm spot to rise for 1 to 1½ hours, until the dough has doubled in bulk.
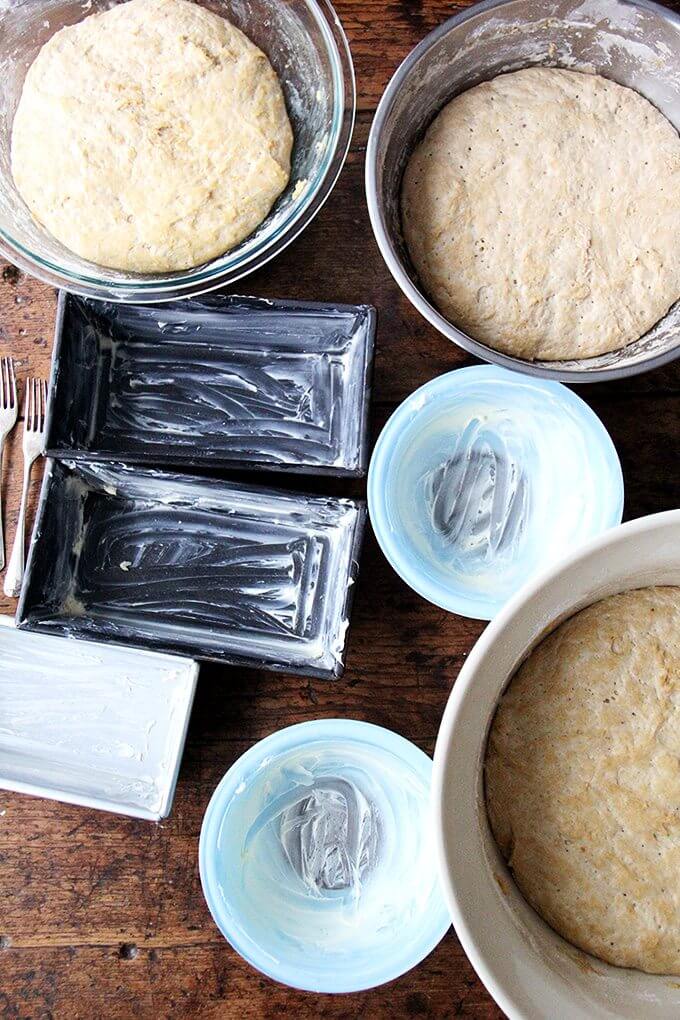
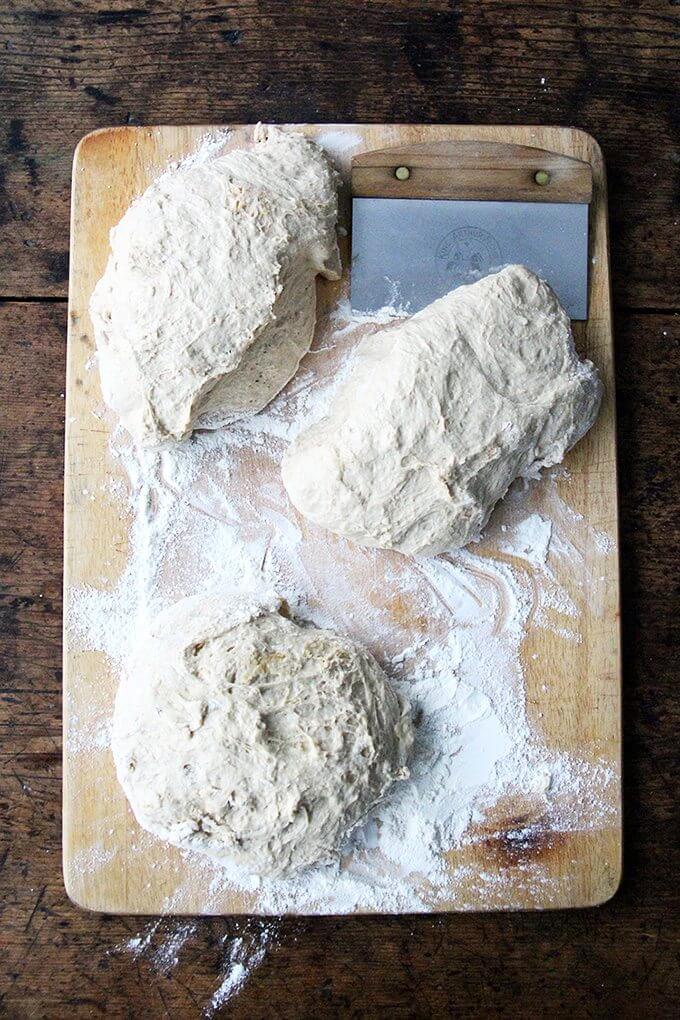
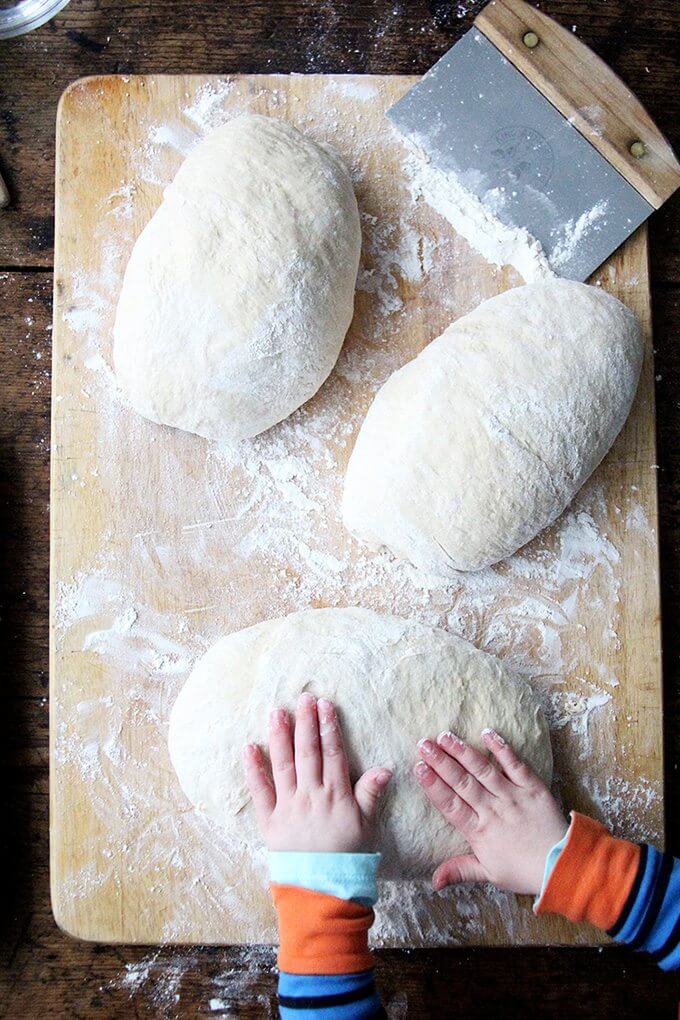
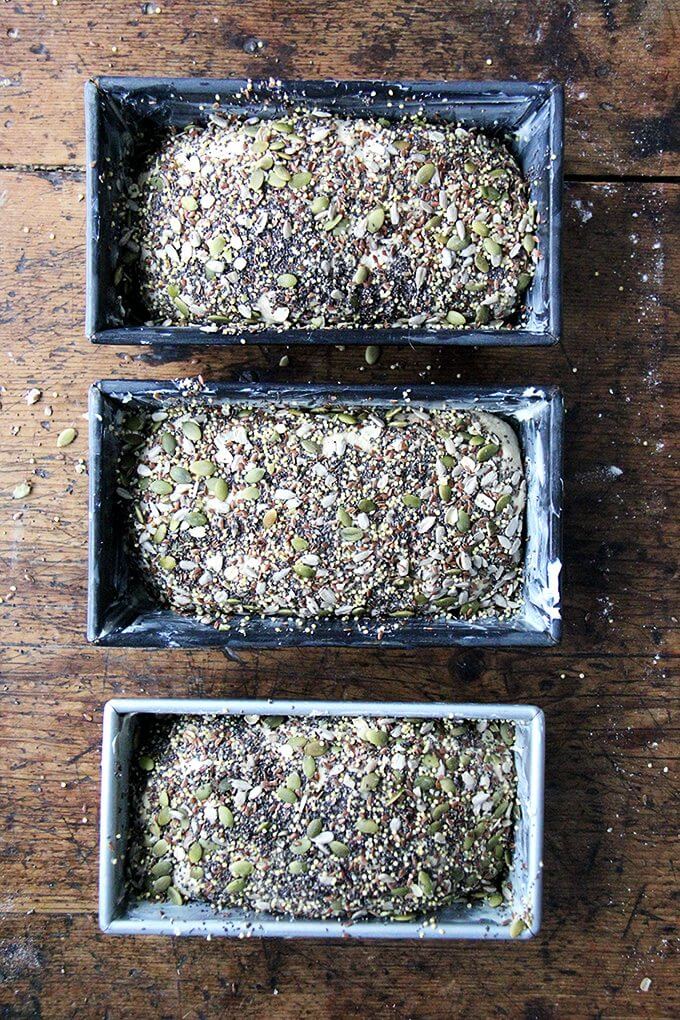
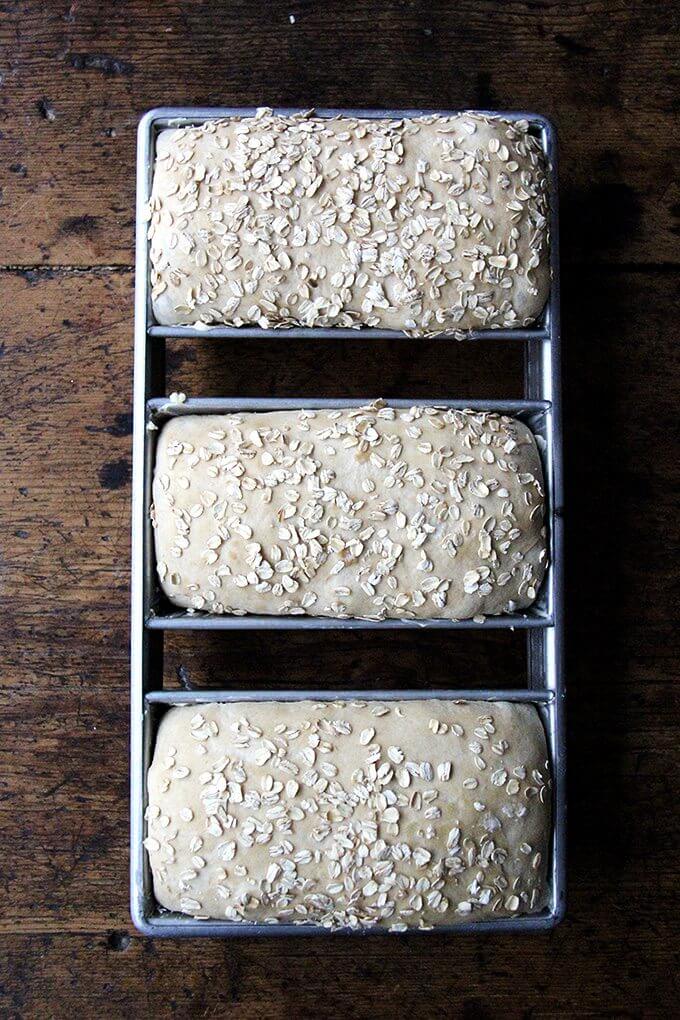
- Place a rack in the center of the oven and preheat it to 375ºF. Grease two standard loaf pans (8.5×4.5-inches) with the softened butter. Spread a generous handful of flour—about 1/4 cup—over a clean surface. If you are coating the loaves in seeds, spread the seeds out on a rimmed vessel such as a small sheet pan. Set a bowl with water and a pastry brush nearby. Using two forks, deflate the dough by releasing it from the sides of the bowl and pulling it toward the center. Rotate the bowl quarter turns as you deflate, turning the mass into a rough ball.
- Use the forks to lift the dough onto the prepared surface. Using as much flour as necessary from the surface, dust your hands and the exterior of the dough, then shape the mass as best you can into a ball. Use a bench scraper to cut the dough in half. Shape each portion into a ball, then flatten into a rectangle/oval—doesn’t have to be perfect.
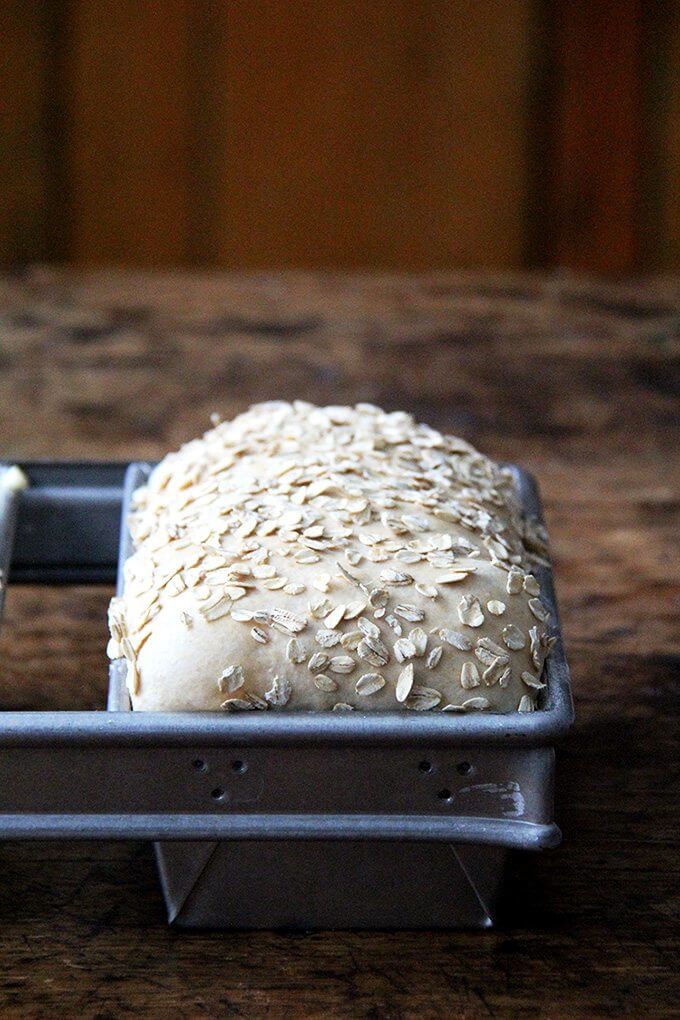
- Brush each portion of dough with water (you can do this on all sides or just the top —whatever you wish). Roll each in the seeds, then transfer to the prepared pans. Let rise until the dough crowns the rims of the pans—be patient. In the winter, I find this takes longer, 30 minutes or more.
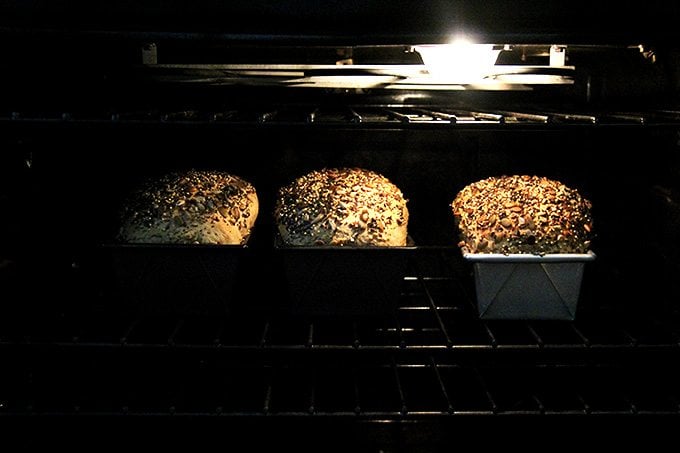
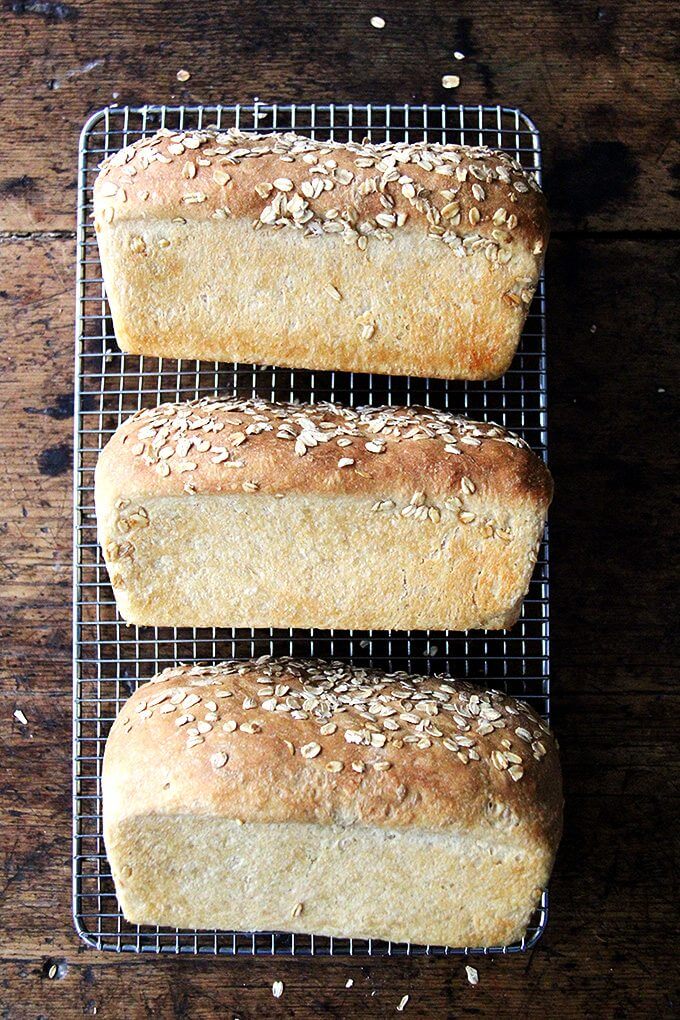
- Transfer the pans to the oven and bake 40 minutes, or until golden. Remove the pans from the oven and turn the loaves out onto a cooling rack. Let cool for at least 20 minutes (longer is best) before slicing.
- Prep Time: 3 hours
- Cook Time: 45 minutes
- Category: Bread
- Method: No-Knead
- Cuisine: American
This post may contain affiliate links. Please read my disclosure policy.


144 Comments on “Sprouted Wheat Sandwich Bread with Seeds”
I saw the comments about the overnight rise but couldn’t find directions to do so. Can you advise? I love your book and have gifted it several times! Excited to try this!
Hi Kirsten! You can do it a couple of ways: you can mix the dough exactly as directed and stick it in the fridge immediately for as long as 3 days; then proceed with the recipe. The second rise will take longer due to the cold dough, so keep that in mind. You can also do it at room temperature. Omit the sugar, and use cold water and 1/2 teaspoon instant yeast. Definitely slick the dough with oil to prevent it from drying out. Cover the bowl with a lid or plastic wrap for the same reason. Thank you so much re book!! 💕💕💕
I can’t wait to make this! Ali can you link the seeds you use?
Hi! I buy most of these at the Honest Weight Food Co-op in Albany because they have an amazing bulk food section, but these are the seeds I used here: flax, millet, pumpkin, sunflower, sesame, and poppy.
This looks so good,going to try this one today I just made the white sandwich bread and it turned out beautiful,just wondering it say makes 2 loafs but you show 3 loads of bread
Thanks fo sharing
Hi Val! The pictures are confusing, but ultimately, it made sense to write the recipe for 2 loaves, since most people have 1 or 2 loaf pans as opposed to three.
Hi there ,I just made the sprouted wheat bread ,,but I found it was so sticky it did rise good ,but I see now that you really used a lot of flour once you took it out of bowl and shaped into loafs maybe I need to add more flour anyways I have it rising so I think this could be my promblem or should I cut down on water next time as I couldn’t even make it into a ball,also I didn’t have any whole wheat so I used 4 cups flour and 2 cups of sprouted spelt
Hi Val! You could use less water from the start next time. A scale will help you ensure you are measuring accurately, too, but if you don’t have a scale, try starting with 2.5 cups water and add more if necessary by the tablespoon.
Is it possible to use all the flour as sprouted (and how the recipe might change) or is there another bread you would recommend I try like if I can’t use any whole wheat flour? Thanks!
Hi Kirsten! Can you clarify? Are you wanting to make a bread with 100% sprouted wheat flour? If so, you can use any bread recipe you like, you just have to keep in mind that it will potentially be on the dense side. The inclusion of all-purpose flour in the mix here helps keep the texture of the bread light.
The focaccia was so good, I’m making it for the 2nd time in 2 weeks. And the Walter Sands recipe is on my list, as is this sprouted wheat recipe! I’ll let you know how it goes–I’m going to use sprouted spelt flour. 🙂
Great to hear, Dana! Thanks so for sharing all of this 🙂 🙂 🙂
The Walter Sands recipe came out fantastic! It’s SOOOO soft, probably the softest bread I’ve ever had! Next up I want to try this sprouted wheat bread, but I’m having a hard time visualizing what you mean about the forks. Can’t I just deflate with my fist and then form the ball? And/or can you point me to a video of someone using this fork method? Thanks!
PS: I found YOUR video on youtube about how to degas with forks! And PPS: whatever table you shoot your photos on, it’s gorgeous!
Great to hear, Dana! So glad you found the video regarding the forks. And I’m so glad you like the table, too. It was an old table sitting in my parents’ basement that they happily handed over when I expressed interest. It’s a little beat up now, but I still love it, too.
Ok, THIS is my new “go to” bread recipe! So easy and fast, so unbelievably soft, and delicious! A note: to my seeds I also add caraway and fennel seeds, plus really nice finishing salt. This plus your focaccia…I’m a happy baker! Thanks for these amazing recipes!
So nice to hear this Dana! Thanks so much for writing and sharing your seed notes 🙂 🙂 🙂
Hi, can I mix using a stand mixer? Thanks!
Yes.